GPU Guide
NCShare comprises of 4 GPU nodes with 192 CPU cores (Intel Xeon Platinum 8568Y+) and 8 NVIDIA H200 GPUs w/141GB of VRAM, 2TB RAM each (32 GPUs in total). This page guides users on how to access and utilize the H200 GPUs using slurm and Open OnDemand.
There are two GPU partitions available on NCShare,
| Partition | Description |
|---|---|
| gpu | General access to H200 GPU nodes. Jobs are pre-empted (cancel and requeue) for higher priority jobs. |
| gpu-hp | High priority access to H200 GPU nodes. Restricted to partner institutions. Each institution is allocated a monthly pool of GPU-hours. |
gpu partition
- General access, scavenger-like partition
- Simultaneous GPU limit per user (MaxTRESPU) = 2
- Max Walltime = 2 days
- Pre-emption = cancel and requeue
- QoS = normal (default)
- Unlimited usage quota
#SBATCH -p gpu
#SBATCH --gres=gpu:h200:1 #Upto 2
gpu-hp partition
- High-priority partition for partner institutions
- Simultaneous GPU limit per user (MaxTRESPU) = 8
- Max Walltime = 7 days
- Pre-emption = No
- Max queue jobs per user (MaxSubmitJobsPU) = 20
- Monthly GPU usage quota per institution
#SBATCH -p gpu-hp
#SBATCH --qos=<institution-qos>
#SBATCH --gres=gpu:h200:1 #Upto 8
The institiution-specific QoS values are provided in the table below. Replace <institution-qos> with the QoS value corresponding to your institutional account.
| Account | QoS |
|---|---|
| duke | duke_h200_hp |
| unc | unc_h200_hp |
| ncsu | ncsu_h200_hp |
| ncat | ncat_h200_hp |
| uncc | charlotte_h200_hp |
| wssu | wssu_h200_hp |
| nccu | nccu_h200_hp |
| davidson | davidson_h200_hp |
| uncfsu | fsu_h200_hp |
E.g., if you are a user from Duke University, you would use the following flags to request 4 H200 GPU on the gpu-hp partition,
#SBATCH -p gpu-hp
#SBATCH --qos=duke_h200_hp
#SBATCH --gres=gpu:h200:4
To check your monthly GPU usage quota, run the following command from a NCShare login node,
get_gpu_quota_account.sh
This will show you the monthly quota for your institution, the amount of GPU-minutes used, and the remaining GPU-minutes. E.g.,
$ get_gpu_quota_account.sh
Institutional Usage (GPU-minutes)
QoS                  | Quota                | Used                 | Remaining
---------------------+----------------------+----------------------+---------------------
duke_h200_hp         | 216000               | 10964                | 205036
The -H will show the usage in GPU-hours instead of GPU-minutes.
$ get_gpu_quota_account.sh -H
Institutional Usage (GPU-hours)
QoS                  | Quota                | Used                 | Remaining
---------------------+----------------------+----------------------+---------------------
duke_h200_hp         | 3600                 | 182                  | 3417
To access the GPU resources, interested users should contact their institutional representative to request access, once they have an NCShare account.
Once access is granted, users can request GPU nodes through the Open OnDemand or through slurm. Please see the sections below for more information on how to request and use GPU resources.
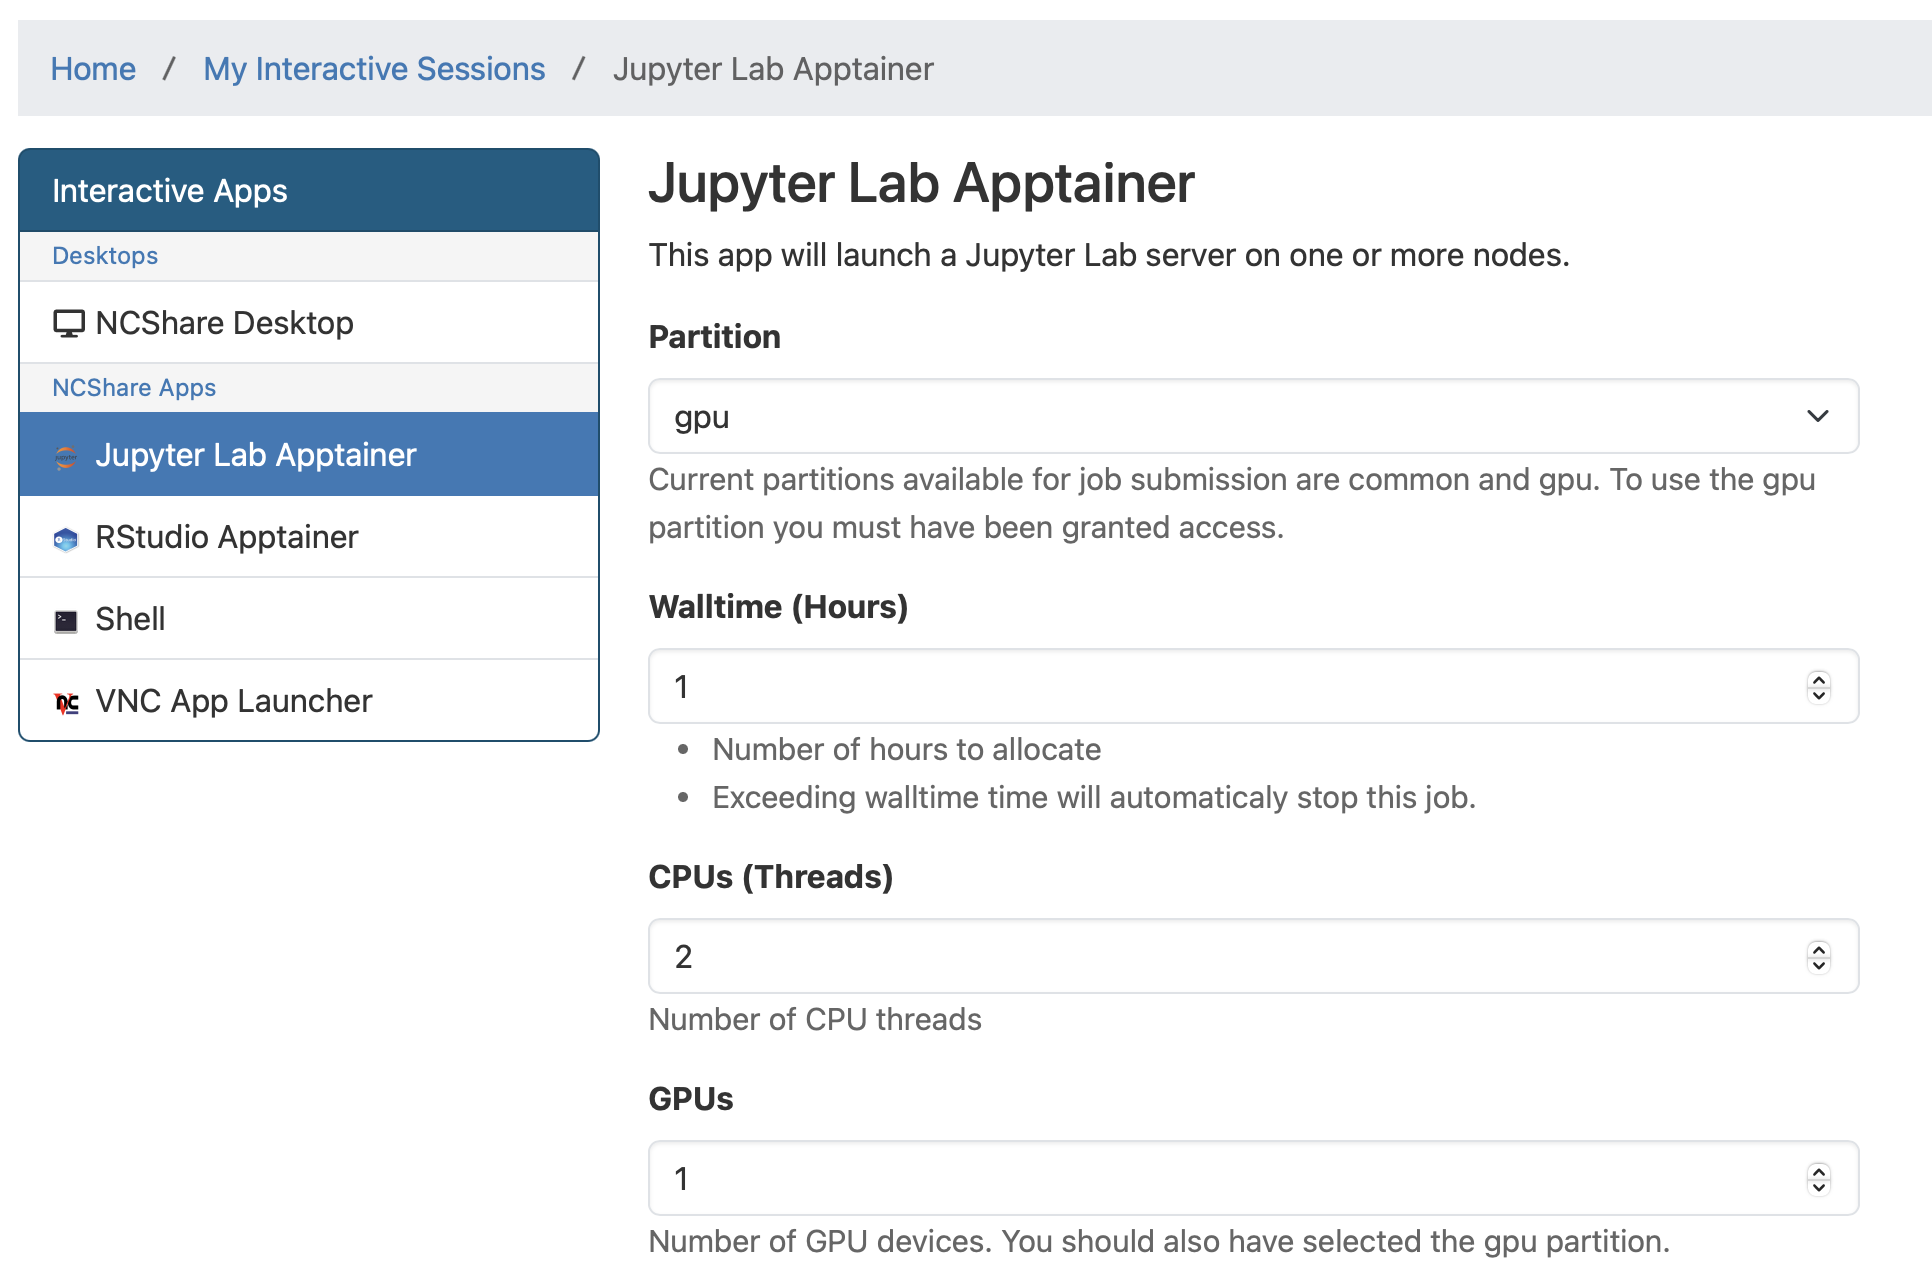
Using H200 GPUs on Open OnDemand
NCShare users can access H200 GPUs through Open OnDemand containers such as Jupyter Lab. A few of these Apptainer containers have been built with GPU support.
Once logged into Open OnDemand, you can select your desired container (e.g., Jupter Lab, RStudio etc.).

If you select Jupyter Lab, you will be taken to the Jupyter Lab Apptainer page where you should select gpu or gpu-hp under Partition and specify the number of GPUs you wish to use under GPUs. If using the gpu-hp partition, select QoS to be <institution-qos> from the drop down menu. Otherwise, leave it as normal. Then click Launch. A similar process can be followed for RStudio.
To verify if the notebook has connected to a GPU, you can run the following code that imports and runs a few PyTorch functions in a notebook cell:
import torch
print("torch:", torch.__version__)
print("torch.version.cuda:", torch.version.cuda)
print("torch.cuda.device_count():", torch.cuda.device_count())
print("torch.cuda.is_available():", torch.cuda.is_available())
If the cell execution shows an output similar to the following, Congratulations!, you have successfully connected to an H200 GPU!
torch: 2.8.0+cu128
torch.version.cuda: 12.8
torch.cuda.device_count(): 1
torch.cuda.is_available(): True
Using H200 GPUs with slurm
First, ensure that you are able to ssh into a NCShare login node from a terminal following the instructions given in the Register an ssh key guide.
Once, you have access to a login node, you will use the following slurm flags to request H200 GPUs for your job.
#SBATCH -p gpu
#SBATCH --gres=gpu:h200:1 #Upto 2
#SBATCH -p gpu-hp
#SBATCH --qos=<institution-qos>
#SBATCH --gres=gpu:h200:1 #Upto 8
where, <institution-qos> is the QoS value corresponding to your institutional account (see table in section gpu-hp partition).
Info
If you are using an Apptainer container to run your slurm job, you will need to include the --nv flag to mount the Nvidia CUDA libraries from the host environment into the container to enable GPU support.
apptainer exec --nv my_container.sif my_gpu_script.sh
Interactive GPU Session
To obtain an interactive GPU session, you can use a command like the following from a login node,
srun -p gpu --gres=gpu:h200:1 -t 1:00:00 --pty bash -i
This requests 1 H200 GPU for 1 hour on the gpu partition. Similarly, to run an interactive session on the gpu-hp partition, you can use the following command,
srun -p gpu-hp --gres=gpu:h200:4 --qos=<institution-qos> -t 1:00:00 --pty bash -i
To obtain information about your allocated GPU, you can run the nvidia-smi command once inside the interactive session.
(base) uherathmudiyanselage1 at compute-gpu-02 in /work/uherathmudiyanselage1
$ nvidia-smi
Mon Nov  3 07:48:27 2025
+-----------------------------------------------------------------------------------------+
| NVIDIA-SMI 570.172.08             Driver Version: 570.172.08     CUDA Version: 12.8     |
|-----------------------------------------+------------------------+----------------------+
| GPU  Name                 Persistence-M | Bus-Id          Disp.A | Volatile Uncorr. ECC |
| Fan  Temp   Perf          Pwr:Usage/Cap |           Memory-Usage | GPU-Util  Compute M. |
|                                         |                        |               MIG M. |
|=========================================+========================+======================|
|   0  NVIDIA H200                    On  |   00000000:4B:00.0 Off |                    0 |
| N/A   31C    P0             74W /  700W |       0MiB / 143771MiB |      0%      Default |
|                                         |                        |             Disabled |
+-----------------------------------------+------------------------+----------------------+

+-----------------------------------------------------------------------------------------+
| Processes:                                                                              |
|  GPU   GI   CI              PID   Type   Process name                        GPU Memory |
|        ID   ID                                                               Usage      |
|=========================================================================================|
|  No running processes found                                                             |
+-----------------------------------------------------------------------------------------+
You can run your GPU tasks inside this interactive session. Once done, you can exit the session by typing exit or pressing Ctrl+D.
Slurm Batch Job Submission
For computationally intensive tasks, it is recommended to submit a batch job using a slurm job script. Below is an example slurm job script that requests 1 H200 GPU for 1 hour.
jobscript.sh:
#!/bin/bash
#SBATCH -J name_of_job
#SBATCH -p gpu #or gpu-hp for high-priority partition
#SBATCH --gres=gpu:h200:1
#SBATCH -t 1:00:00
##SBATCH --qos=<institution-qos> #Uncomment for gpu-hp partition

# Initialization
source ~/.bashrc

cd $SLURM_SUBMIT_DIR

cat << EOF > compute-gpu-01.py
#!/usr/bin/env python

import torch
print("torch:", torch.__version__)
print("torch.version.cuda:", torch.version.cuda)
print("torch.cuda.device_count():", torch.cuda.device_count())
print("torch.cuda.is_available():", torch.cuda.is_available())
EOF

chmod +x compute-gpu-01.py
./compute-gpu-01.py > compute-gpu-01.log
For advanced users who are running computationally intensive jobs, the following additional optional flags might be useful,
#SBATCH -N 1                 # Total no. of nodes
#SBATCH --ntasks-per-node 96 # Tasks per node
#SBATCH -c 2                 # CPUs per task
#SBATCH --mem=500G           # Memory per node
To submit the job script, use the following command from a login node:
sbatch jobscript.sh
You can monitor the status of your job using the squeue command:
squeue -u $USER
Measuring GPU Efficiency
As the H200 GPUs are a limited shared resource, we encourage users to be mindful of their GPU usage and to use the resources efficiently. We will be sharing weekly usage reports with the goal of helping users better understand their GPU usage patterns and to support more efficient and effective use of the partition.
Users may also use the slurm-gpu tool developed by Joe Shamblin at Duke University to measure the GPU efficiency and GPU memory efficiency of their jobs.
- The GPU efficiency (
GPUEff) represents the percentage of time GPU compute resources were actively engaged as reported bynvidia-smi. - The GPU memory efficiency (
GPUMemEff) represents the percentage of GPU memory (a H200 GPU has a total of 141 GB VRAM) that was actively used during the job.
From a login node, run the following command to check the GPU efficiency of your jobs for a specified time range,
slurm-gpu report -r <partition> -S YYYY-MM-DD -E YYYY-MM-DD -u ${USER}
E.g.,
$ slurm-gpu report -r gpu-hp -S 2026-02-10 -E 2026-02-13 -u ${USER}
┌───────────────────────┬────────┬──────────────────────┬──────────┬─────────┬────────┬────────┬────────┬─────────┬───────────┬─────────┬───────────┐
│ User                  ┆ JobID  ┆ State                ┆  Elapsed ┆ TimeEff ┆ CPUEff ┆ MemEff ┆ GPUEff ┆ GPUUtil ┆ GPUMemEff ┆  GPUMem ┆ Partition │
╞═══════════════════════╪════════╪══════════════════════╪══════════╪═════════╪════════╪════════╪════════╪═════════╪═══════════╪═════════╪═══════════╡
│ uherathmudiyanselage1 ┆ 478388 ┆ TIMEOUT              ┆ 00:02:24 ┆  100.0% ┆   6.2% ┆  34.1% ┆ 100.0% ┆    200% ┆     89.7% ┆  251.1G ┆ gpu-hp    │
│ uherathmudiyanselage1 ┆ 478389 ┆ TIMEOUT              ┆ 00:03:01 ┆  100.0% ┆  11.0% ┆  41.5% ┆ 100.0% ┆    600% ┆     89.7% ┆  753.4G ┆ gpu-hp    │
│ uherathmudiyanselage1 ┆ 478391 ┆ COMPLETED            ┆ 00:02:54 ┆   96.7% ┆  37.9% ┆  49.4% ┆ 100.0% ┆    800% ┆     89.7% ┆ 1004.6G ┆ gpu-hp    │
│ uherathmudiyanselage1 ┆ 478392 ┆ COMPLETED            ┆ 00:01:51 ┆   92.5% ┆  56.8% ┆  47.0% ┆ 100.0% ┆    800% ┆     89.7% ┆ 1004.6G ┆ gpu-hp    │
│ uherathmudiyanselage1 ┆ 478393 ┆ CANCELLED by 3000100 ┆      --- ┆    0.0% ┆    --- ┆    --- ┆    --- ┆    0.0% ┆       --- ┆     --- ┆ gpu-hp    │
│ uherathmudiyanselage1 ┆ 478394 ┆ TIMEOUT              ┆ 00:08:48 ┆   80.0% ┆   7.6% ┆  45.4% ┆ 100.0% ┆    800% ┆     89.7% ┆ 1004.6G ┆ gpu-hp    │
│                       ┆        ┆ WEIGHTED AVG         ┆ 00:18:58 ┆         ┆  17.4% ┆  44.1% ┆ 100.0% ┆  692.3% ┆     89.7% ┆     --- ┆           │
└───────────────────────┴────────┴──────────────────────┴──────────┴─────────┴────────┴────────┴────────┴─────────┴───────────┴─────────┴───────────┘
The last row of the output table shows the time-weighted average GPU efficiency and GPU memory efficiency across all your jobs in the specified time range. This quantity is formulated as,
where, \(i\) is the index for your jobs, \(GPUEff_i\) is the GPU efficiency of job \(i\), and \(\text{time}_i\) is the elapsed time of job \(i\). A similar formula applies for the time-weighted GPU memory efficiency.